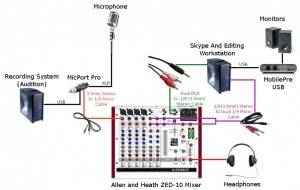
- How do you get this to work with a phone? (Credit: Michael Rhys)
In this post I’m going to describe how you can set up a simple remote phone patch which allows a remote client to work with you in realtime as you record. This type of setup is invaluable for any voiceover artist working out of a home studio.
Once you’ve set up your studio with this configuration a remote engineer/producer can call you on the phone, you will hear them in your headphones and they will hear your voice from your VO microphone. You record your audio to your local system as normal while they can provide direction and feedback. The remote audio isn’t recorded, just as though the engineer was in the next room and talking to you in your cans.
Cool, huh? Let’s get started. A quick note: The instructions in this post are excruciatingly detailed. I broke down everything into basic details and provided a lot of background information, so it may seem longer than it should be. I also assumed you have little or no technical background, so some of this may already be stuff you know.
Disclaimer: I’m not responsible if you can’t get this to work or if you break your equipment trying to do so. Nothing described here should be risky to any decent audio equipment but anything you do based on this post is at your own risk. 🙂
I’m here, he’s there!
In the modern voiceover world, the voiceover talent is often not in the same location as the customer. You may find yourself in Seattle doing a recording for someone in Los Angeles, for example. In such a situation, how do you work closely with the producer and engineer as you might do in a studio?
Normally, when you’re in a recording studio, the engineer and producer park it at the mixing board and can listen to what you’re saying. You’ve got headphones on so they can talk to you to provide direction and feedback. Not exactly practical when you’re 1500 miles apart!
Many technologies exist to address this scenario- some more expensive than others. The setup I describe here is quite easy to do with most home audio recording setups using the kind of gear you’d find in a home VO studio.
The Ingredients
Here’s what you’ll need to use this type of setup. Depending on what gear you currently have you may have other options- feel free to hit me up in comments for suggestions on your setup.
The Computer
You will need a computer with onboard sound- doesn’t matter if it’s a Mac or a PC, as long as it has its own audio inputs and outputs. This may or may not be the PC you do your recording on, you can just as easily do this with two PCs. It does have to have an unused set of audio connections- a mic input and a sound output. This is the system you’ll be running Skype on. If you have a second system for your recording, don’t make any changes to that.
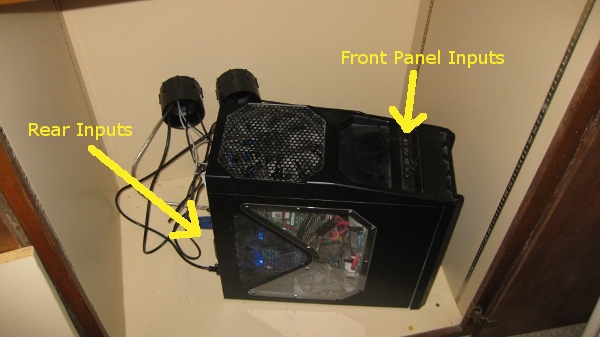
Most PCs have more than one set of inputs.
Here’s a picture of my system, which you can see has two sets of audio jacks (well, you’ll have to take my word on the ones in the back). I use the set on the front for my normal headphone/mic combo, which is what I use for gaming and just normal use- I don’t use that headset for any voice recordings (but it’s great for playing Team Fortress 2!). The rear jacks are hooked up to my mixer, allowing me to listen to Skype calls while recording separately.
The Mixer
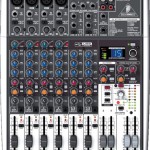
Behringer Xenyx X1204 USB
The next thing you’ll need is an external mixer with: aux send(s), a stereo input channel, a second bus (sometimes referred to as an alt bus) and a USB/FireWire output to your system. Some examples of mixers you might use are the Behringer Xenyx X1204, the Allen and Heath ZED-10, and the Mackie Onyx 820i Firewire mixer. This is by no means an exhaustive list and many other options exist.
I personally use the Behringer X1204 Xenyx USB, pictured to the left. Any of the ones I’ve mentioned, or any mixer with a digital interface, aux sends and an input channel supporting stereo input will work.
Cables
You’ll need cables to connect your mixer and soundcard. For most configurations you will need these two cables:
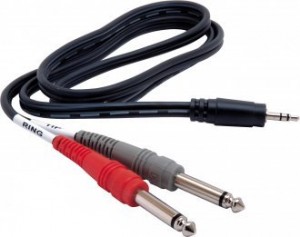
3.5mm Stereo Male to Dual 1/4" Mono Male Cable
A 3.5mm Male Stereo to Dual Mono 1/4″ Male Cable. It looks like the picture on the right. It might or might not say TIP and RING on the dual ends, but it can be helpful for making sure you get the left and right stereo channels correct. Ring/Red is right, Tip/Grey is left.
This cable will be used to connect your Skype audio output to a secondary channel on your mixer. Because of this it’s important that your mixer have a stereo Line In channel. On most mixers there will be one or two channels like that. It’ll usually have a name like LINE IN 5/6 or LINE IN 7/8. Note that your main mic/instrument channels are mono and you can’t simply plug a stereo signal into them.
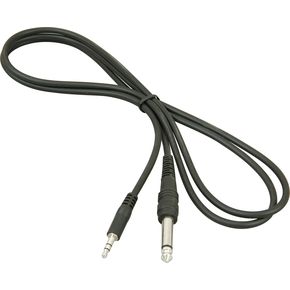
3.5mm Stereo to 1/4" Mono Patch Cable
A Male Mono 1/4″ to Male Stereo 3.5mm Cable. It looks like the picture on the left. Make sure it’s mono on the 1/4 end and stereo at the 3.5mm end. This cable is what we run from the Aux Send on your mixer to the mic input on your PC.
Both of these cables are available in any audio store or your local music shop, and come in varying lengths and prices. You don’t need to spend a huge amount of money on these- they’re going to be carrying a telephone-quality signal, so don’t go buy some uber-expensive supercables or something.
Make sure the cables are long enough, though! Nothing’s more frustrating than not having enough cable to run from your PC to the mixer. So measure your distance or at least eyeball it before you buy the cables.
You can find both of these cables online as well- the 3.5mm(1/8″) stereo to 1/4 mono is here, and the 3.5mm(1/8″) stereo to dual 1/4 mono is here. (these are just sample links, I’m not endorsing the website in question, and you can find these all over if you dig around)
Software

Skype
You’ll need a Skype account (optionally with a phone number) and the Skype software, plus whatever software you normally use for recording. You could theoretically use any VOIP software that can accept phone calls to your system- I only provide instructions here for Skype but feel free to try other VOIP solutions if you prefer! You have various options for your Skype account, depending on whether you want to have a phone number that people can call or only wish to be able to dial outbound to phone numbers.
Of course, if your remote engineer/producer is on Skype, it’s moot- you can just do a direct Skype call. Win!
Running the Cables
Make sure your mixer is turned off for now.
Take the 3.5mm stereo to 1/4″ mono cable (the one with one plug at both ends) and locate the port on your mixer marked Aux Send or Aux Sends. You might have two of them, or one might be labeled FX Send. If you have an Aux and FX Send, use the Aux one.
Here’s the Aux Sends on a Behringher Xenyx series mixer. This is on the upper right portion of the mixer. Plug your cable into the top one.
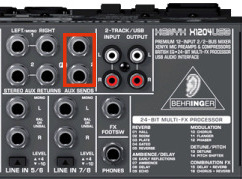
The Aux Sends on a Behringer Xenyx X1204
Here’s the Aux Sends on a Mackie Onyx 820i.
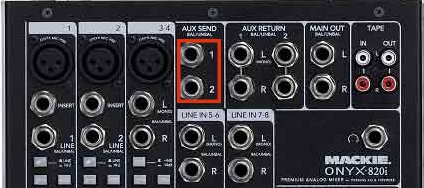
Aux Sends on an Onyx 820i
Here’s the Aux Send (there’s only one) on an Allen and Heath ZED10.
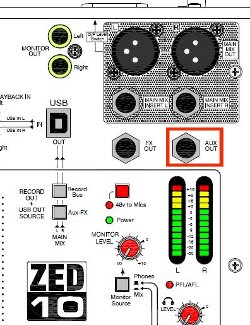
Aux Send on the ZED 10
As you can see, varying mixers tend to have the same or very similar names for the inputs and outputs. If you’re using a different mixer and it’s not immediately obvious where the Aux Send is, check your documentation.
Once you’ve located the Aux Send on your mixer, plug in the 1/4″ (mono) end of the 1/4″ mono to 3.5 mm stereo cable into it. Next, run the cable’s 3.5mm end to your PC and plug it in to the microphone jack you’re planning on using. This might be on the back of the computer if you want to use the secondary connections on your system (I use the primary ones on the front for other stuff, personally).
Now take the other cable- the 3.5 mm stereo male to dual 1/4″ mono one and locate your mixer’s Line In 5/6 channel or its equivalent. It might have a name like Stereo Input Channel or ST 1 or other names depending on your mixer. Most mixers have several instrument/mic inputs and one or two “line” inputs which instead of a mono signal like you get from a mic or guitar, have a left and right channel. That’s what you’re looking for.
Here’s the Line In 5/6 channel on the Behringer Xenyx X1204.
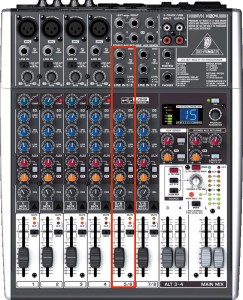
The Line In 5/6 Channel on a Behringer Xenyx X1204.
Here’s the Line In on the Onyx 820i.
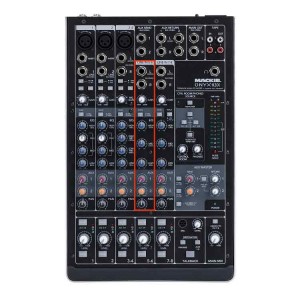
The Line In 5/6 Channel on an Onyx 820i.
Here’s the Stereo 1 channel on the ZED10.
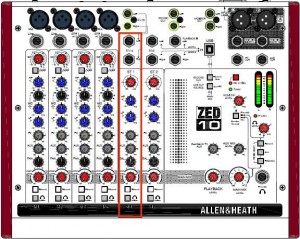
Stereo Channel 1 on a Zed 10.
You should consult your mixer’s documentation if you can’t easily determine which channel to use.
Plug your two mono connectors- they may be labeled TIP and RING and they may be colored red and grey/black/white. The one labeled TIP and/or colored red goes in the right channel, the one labeled RING and/or colored grey/black/white goes into the left channel.
Run the 3.5mm end of this cable to your PC and connect it to the headphone jack you plan to use. This might be on the back or the front depending on your system and your needs. I suggest you use the partner of the one you’re using for the microphone- that is, if you’re using the rear mic jack, use the rear headphone jack.
Adjusting the Mixer Settings
This part is pretty important, so read it carefully. If you get these settings incorrect you either won’t hear anything or you’ll hear a lot more than you wanted to- or worse, you’ll blow out the eardrums of your partners on the phone with you. Feedback sucks.
We need to set your mixer to do a few things: Send a part of your normal recording input to the Aux Sends. This will pipe a portion of the signal from your expensive condenser mic or whatever you use for your voice recording to the mic input on your PC. We’ll also need to make sure the return signal is at a proper level and that it’s routed so that you can hear it on your headphones but it doesn’t go to the mix output.
Easy enough- read on!
Setting the Aux Send Levels
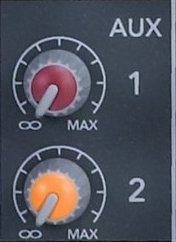
Aux Send Knobs (Onyx 820i)
On the channel you pipe your mic or preamp into, locate the knob labeled Aux Send, Aux, or similar. Turn this to about 25%- that’s just a starting point, we’ll adjust it below when we play with Skype. If your mixer provides an FX Send and you don’t use any external effects processor (and if you do, you’re probably not needing to read this tutorial!), turn it down.
On the Line In 5/6 or Stereo channel- the one you ran the two 1/4″ mono jacks to in the previous step- locate a knob labeled Aux, Aux Send or similar. TURN IT ALL THE WAY DOWN. If there is an FX Send knob on this channel, turn it all the way down also. If you have the Aux Send turned up at all on this channel, you’ll be sending the returned audio from Skype right back to it! That leads to feedback, distortion and pain.
Setting the Return Levels and monitor
On the channel you sent the output from your PC to- that’s the Line input where you ran the dual-ended cable- we’ll need to make some settings. If your mixer has a level button for the channel (the Behringer Xenyx, for example) set it to the lower option- in my case I use the “up” position which is -10. For other mixers you may have a gain knob. Set it to 0 gain for the time being.
Next, set the channel to the alt/mute bus. On some mixers you’ll have a button labeled MUTE ALT 3-4 while on others there may be two buttons like Record and Headphones. Make sure the mute button is selected, or if you have two buttons, that the Record one is off while the Headphones/Monitor one is on. This makes it possible for this channel to be heard in your headphones while not being sent to the output!
Lastly, your mixer probably has a few buttons next to the monitor gain knob. They should have names like MAIN MIX, ALT 3-4 and possibly USB/Firewire. These buttons determine which “buses” are sent to your headphones. You’ll want to hear both the main mix and the alt bus. If you’re uncertain check your documentation or post a comment below and I’ll see if I can offer any assistance.
Note: If your mixer has a global gain knob for the Aux Sends (the Behringer does, for example), set it to 0 (zero)- that’s NOT all the way down, that’s in the center for most mixers.
A Quick Note about Windows and Audio Devices
You may need to tweak your Windows settings for your soundcard to enable extra inputs on your PC- sometimes they’ll be disabled or not useable until you’ve made the proper settings. Unfortunately there are so many possible combinations of these that I can’t tell you exactly how to check yours- in general you can right-click on the speaker icon in the task bar and explore the settings.
If you find yourself stuck and think your Windows settings might be the culprit, drop me a note and I’ll try to provide what assistance I can.
Configuring Skype
Next we’ll set up Skype. We’ll connect Skype’s audio input and output to the mixer’s aux sends and stereo inputs, respectively. To do this you’ll need to set up your system as though you were going to record. So now you should power up your preamp, your mixer and all your goodies. Get the mic positioned so you can use it while sitting at the system you use Skype on while we do these tests.
Open the Skype software and click Tools, Options…
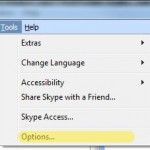
Select Tools, Options
On the Options dialog, locate the Audio Settings button on the left.
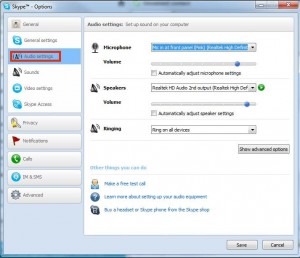
Select the "Audio Settings" button on the left
Setting the Skype Mic Level
Next we need to select the proper audio input by picking a “microphone” for Skype to listen to.

Choose your audio input
You can select from a list of whatever audio inputs your system supports here. Your list will vary from what mine shows here, and you may find that it’s not easy to figure out the right one. Some systems will be much more descriptive- as you can see, mine says very clearly where the mic input is and even describes the color of the connector on the computer’s case.
You should select the mic input that corresponds to the input you plugged the Aux Send from your mixer into. Once you do this, the bar underneath should show activity when you speak into the mic. I suggest turning off the “automatically adjust” option and just setting the blue dot so the level is about 3/4 up the slider when you’re speaking in a normal tone.
Not seeing anything happen? No problem! First, check that your mic is on and and all that- confirm that your mixer is sending audio by doing a quick test recording. Next, double-check the mic input you selected.If you’re seeing the bar move when you speak but it’s too low, you can turn up the gain by adusting the Aux Send knob on your mixer’s mic input channel- remember how you set it to about 25% before? Turn it up until you see your voice peaking at about 75-80% on the meter. You can also use the blue button on the gain bar to adjust the volume once it gets to Skype.
If you’re still not seeing anything, check your PC (the one you use Skype on) and make absolutely certain you’ve got your cables connected to the proper connections. Many PCs have a plethora of audio jacks, making it easy to get your mic/speaker cables swapped or simply connected to the wrong jack. Consult your PC’s documentation if necessary to verify the position of your mic and speaker jacks.
If you’re seeing the bar “pegged” with solid green or it’s constantly active, like it’s picking up every little noise, you can turn the gain down on the Aux Send to compensate or lower the gain in Skype by moving the little knob to the left.

Skype Speaker Dialog.
Below the microphone settings is a drop-down to select the speaker Skype should route output to. Select the output you connected the Line In channel on your mixer to. This will cause Skype to send its audio output to your mixer, where you can hear it.
Once you’ve selected the appropriate connection, make sure you’ve got your headphones on and hit the green test button- if you’re configured correctly you’ll hear the Skype ringtone play in your headphones. If it’s too quiet, adjust the volume in Skype or turn up the gain for the Line In channel on your mixer. If it’s too loud, do the reverse.
If you don’t hear anything, no problem! Check that you chose the right connection in the output. Also make sure you’re monitoring that channel on your mixer, and make sure that the monitor/headphones options on your mixer are set to send the alt bus to your headphones.
Once you’re happy with the settings, select the Save button on the lower right of the options dialog to return to Skype.
Putting It All Together
Here’s where Skype really comes into its own. You can adjust your settings and levels without having to get someone to call you by using the Skype Call Testing Service.
In your Skype contacts you should have the Echo/Sound Test Service listed. Set yourself up as though you were going to record- pretend that the call test service is your engineer or producer and phone it up.
You’ll hear a woman with a British accent welcome you to the call testing service. Adjust the gain on your Line In channel to your taste- this is how loud your remote partner will sound to you in a real call.
After a moment you’ll hear a beep- you’ve got about 5-8 seconds to record a few words for posterity. Just speak as though you were recording some copy. When the beep happens again, you’ll hear the audio you recorded played back- this is where you can hear what it will sound like to your remote partner, which allows you to tweak it for greatest quality and optimal sound levels BEFORE you call someone and they complain you’re blasting their eardrums out of their head.
You can make as many calls to the Skype call test service as you like, and I suggest doing it until you’re happy with the results. I also suggest recording locally as though you were cutting a real track for someone while you’re on the line with the Call Test Service- make sure that on the final recording only your voice comes through, while Skype is only routed to your cans.
Conclusion
With this setup you can call someone or have them call you via Skype- and even use a real phone number if you pay Skype for it (I do), and your engineer can hear you as you record, provide you direction and feedback and when you’re done you just take the audio you recorded locally and send it on over. Cool, no?
I hope this little tutorial was helpful! Please let me know if you have any suggestions, questions or criticisms in the comments below- if I missed something or you think something could use clarification, etc, I’d love to hear about it. Also, I’m happy to answer what questions I can about your setup.
Links
Here’s a list of all the product links in the article.
Credits
The Neumann U87 photo at the top of this post is copyright © by Michael Rhys and used under a Creative Commons license. See his other photos here: http://www.flickr.com/photos/michaelrhys/40428909/

